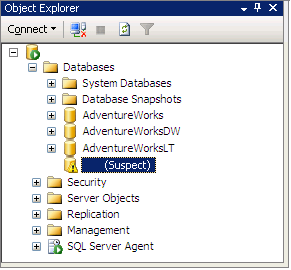
SQL Server is a commonly used RDMS (Relational Database Management System). It’s used by both small & large enterprises in order to manage data.

SQL Server is a commonly used RDMS (Relational Database Management System). It’s used by both small & large enterprises in order to manage data.
When a database is marked as the ‘Suspect’ then users can’t access their database until and unless they recover database from Suspect Mode to Normal.
Nevertheless, to help such users, we have equipped a helpful post that contains complete info regarding what is the suspect database and why database goes to Suspect Mode in SQL Server.
Also, you will learn here how to change the SQL database Suspect Mode to Normal Mode effectively. So, let’s get started.
A Suspect Mode is a database state in SQL Server that includes Online, Restoring, Recovery Pending, Suspect, Emergency, and more.

On the other hand, we can say, this database state specifies the active mode of the exact database. And the Suspect database in MS SQL simply means that a recovery process of the database is started but did not complete.
Therefore, the Suspect Mode in SQL Server further indicates that the database isn’t available to access and so you’re not able to connect to database server or recover it throughout server startup.
There’re countless reasons that can lead a database to go to suspect mode in MS SQL.
Now, let’s move ahead to find the possible solutions to deal with the suspect database in SQL Server.
Resolve SQL Server Supsect Database issue Easily
If you want to manually remove and recover database from the suspect mode, follow these steps:
Step 1- Turn a database to an Emergency Mode. Launch SQL Server Management Studio then connect database. Select the "New Query"
On the database, disable a suspect flag >> switch to EMERGENCY:
EXEC sp_resetstatus 'db_name';
ALTER DATABASE db_name SET EMERGENCY
Step 2- Now, check a function consistency on Master Database. To do this, run this command:
DBCC CHECKDB ('database_name')
Step 3- Here, you have to bring a database to Single User Mode, & then roll back the earlier transactions. To do this, run this command:
ALTER DATABASE database_name SET SINGLE_USER WITH ROLLBACK IMMEDIATE
Step 4- At this time, it is important to create a backup of the database because the next process may lead to data deletion.
Step 5- Perform the Database Repair by allowing some of the data loss. Run the following command:
DBCC CHECKDB ('database_name', REPAIR_ALLOW_DATA_LOSS)
Step 6- Switch database to Multi-User Mode. For this, you have to follow the below command:
ALTER DATABASE database_name SET MULTI_USER
Step 7- Finally, refresh a database server along with verifying the connectivity of your database.
DBDC command cannot give 100% database recovery result.
It is not recommended to use the manual workaround if you haven’t taken a proper backup of your database. In that case, you should immediately go for an automatic solution.
If DBDC command returns any logical error, you cannot continue with the manual way but you need to use a different repair process as per the error.
If the above workaround failed to bring SQL database suspect mode to normal mode, it is possible that your server database file is severely corrupt.
In such a case, you should immediately opt for the specialized Stellar Repair for MS SQL. This program will surely assist you to recover the database from suspect mode along with fixing the corrupt SQL Server database (MDF and NDF) files.
This guest post was written by Iqbal Singh of Stellarinfo, . [published on 18-Feb-2023]

Learn web development, Free Tutorials, Learn Skills!

Let's help your kids start coding, a baby step can make big difference in their future.
